So I’ve had these Padouk boards for about thirty years now. I’ve used a few of them for fingerboards. I have about fifteen left.
I found them in a skip in Manchester.
I couldn’t believe it. WTF?
I picked up as many as I could carry.
There were loads more that I had to leave behind. But also I didn’t want to be too greedy.
I’m funny with wood. I make stuff out of recycled wood, basically. So everything I make has led another life – and I get superstitious and paranoid about it.
I used to pick up stuff from the skip behind this house clearance/auction room type of place – old bed frames mostly. So, you know, these were likely to be beds that people died in.
The back of my double bass was once a headboard panel from such a bed.
And this Padouk – it is quite possible that people died harvesting it, commerce, colonialism and empire being what they were, or still are.
I have these bits of salvaged timber – not that much really – some of it is obviously a century old, maybe more. Sometimes it feels sort of sacrilegious to take a saw to it.
I have dismantled a lot of old furniture over the years to salvage the wood, mainly furniture that needed dismantling, but some that was so tough to take apart that it probably should have stayed together, the joints were so nicely made.
So I get paranoid and superstitious about that too – maybe there is some old joiner in the spirit world who hates me for pulling his table apart?
And then there’s the tools. Some of them are a century old too. Dead people’s beds, dead people’s tools.
And sometimes I make stuff and hold on to it for years and then just saw it up and burn it.
So I feel guilty about wasting that nice wood. I feel guilty that I have the luxury of being able to burn it. Not so many people can have a real fire these days.
For the moment I can, now and then. They are always good fires – all that dry old timber.
But that is one of the nice things about it – that you can burn it and it makes a nice fire – not like all that MDF stuff that everyone has a house full of these days. That will not make a nice fire.
So… about fifteen boards of Padouk – each one about 1/2″ thick, 2 1/2″ wide, and about 30″ long.
What can I make that’ll do it justice?
15 of 1/2″ x 2 1/2″ x 30″
30 of 1/2″ x 1 1/4″ x 30″
60 of 1/2″ x 1 1/4″ x 15″
60 x 1 1/4 = 75
7 x 75 = 525
525 divided by 22 = 23 point something. So if I cut all that Padouk carefully I can make a fifteen inch long cylinder with a diameter of almost twenty four inches.
See, I have this drum kit – a cheapo drum kit with plywood shells. I stripped off the Gene Krupa-esque wrap long ago ’cause I like wood – even plywood sometimes.
But some of that plywood underneath that wrap was atrocious – bits of torn out grain, holes, plastic filler, delamination.
I did what I could to patch things up, but really some of those shells are nasty. So last month I just spontaneously cut up these bits of Oak I had and built a stave shell for the 12″x 8″ tom.
I say ‘spontaneously’, but it’s a lot of work – you have to plane a precise angle on both edges of each stave so they fit together in a precise circle, then you have to glue them all together – thirty-nine of them in the case of that shell. Then you have to plane it, inside and out.
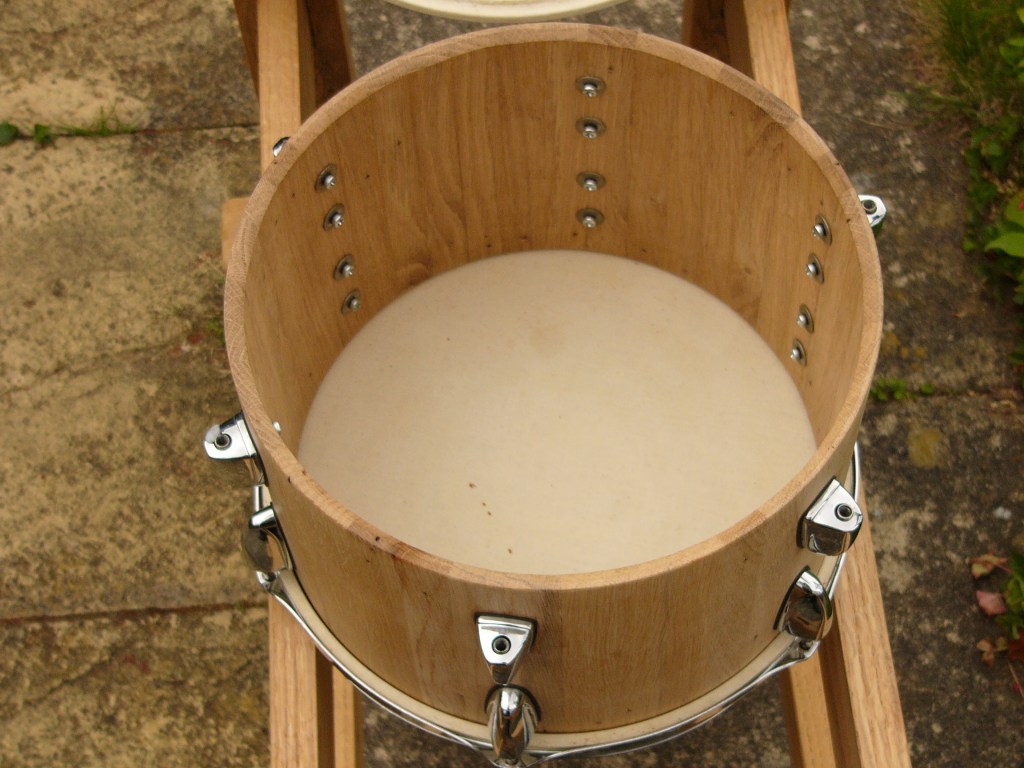
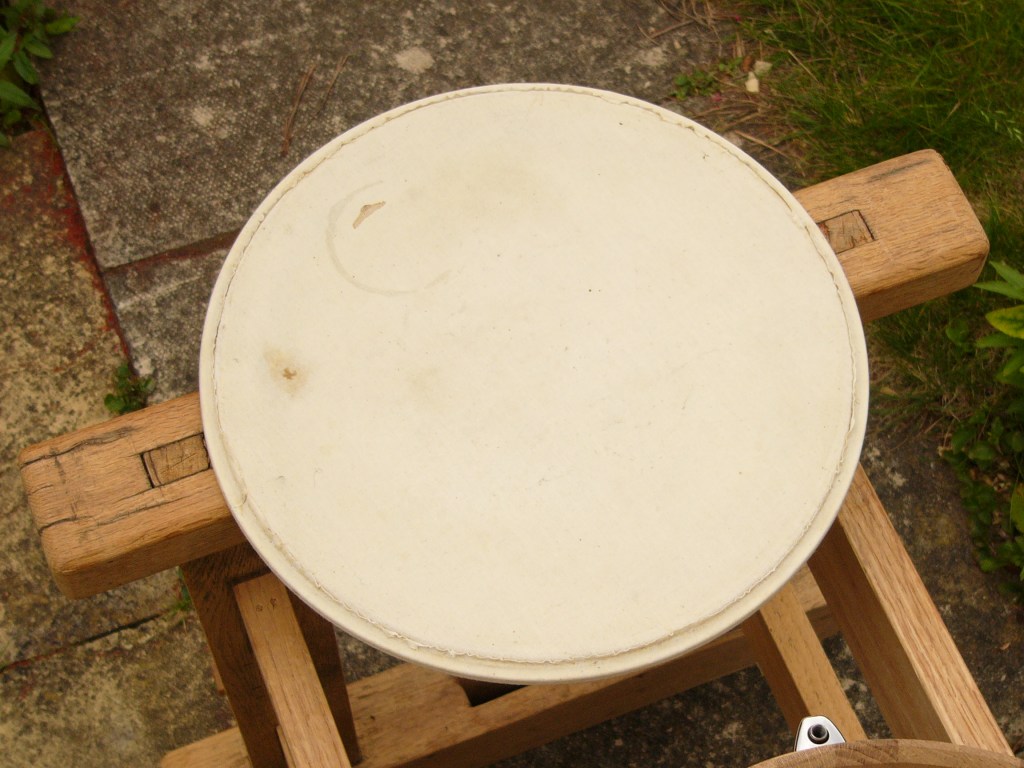
Oh… and I also cut plastic drum heads off their hoops and made these calico drum skins to replace them.
And yes, I have used drums as improvised coffee tables..
So anyway I ended up with this nice tom, but it makes the other drums feel a bit flimsy. I mean, the tom is supposed to sit on top of the bass drum, but the existing bass drum is really light in weight, so I feel like having a nice solid bass drum to go with that tom.
I’m not going to make a 24″ bass drum though. It is going to be 18″, because the skins and hoops I have are 18″.
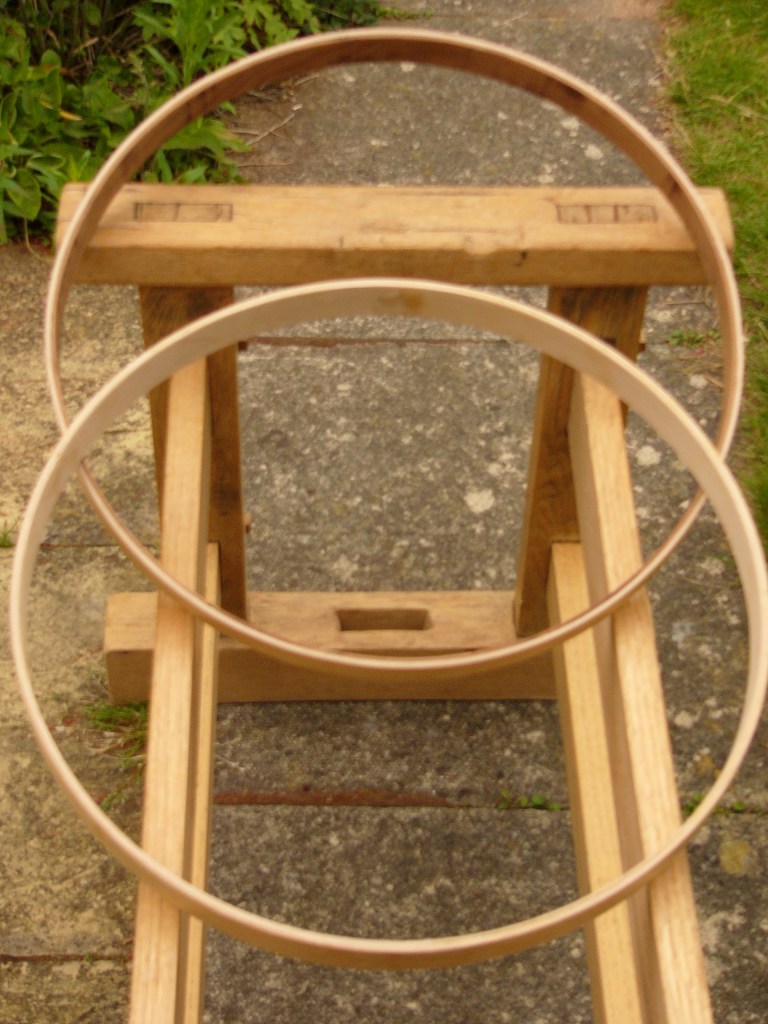
Actually, I just made two new hoops for the existing bass drum because the ones that came with it are a bit too big, and I am pretty sure they are the same nasty plywood (or worse) as the shells.
I think I might be three-quarters of the way through a manic episode of drum-making, from which I will be coming down just as I start cutting up that Padouk.
It’s the curse of that old joiner whose table I broke up, or something.
I’m going to try and keep tabs on myself while I am doing this, so you (and I) get an idea as to how many hours it takes, and what would be a fair price for such a shell if I was crazy enough to try and earn a living from making them commercially.
Maybe I’ll grant myself an imaginary minimum wage too.
.
Friday 8th of June 2018 9am -2pm. rip-sawing boards in half lengthwise:
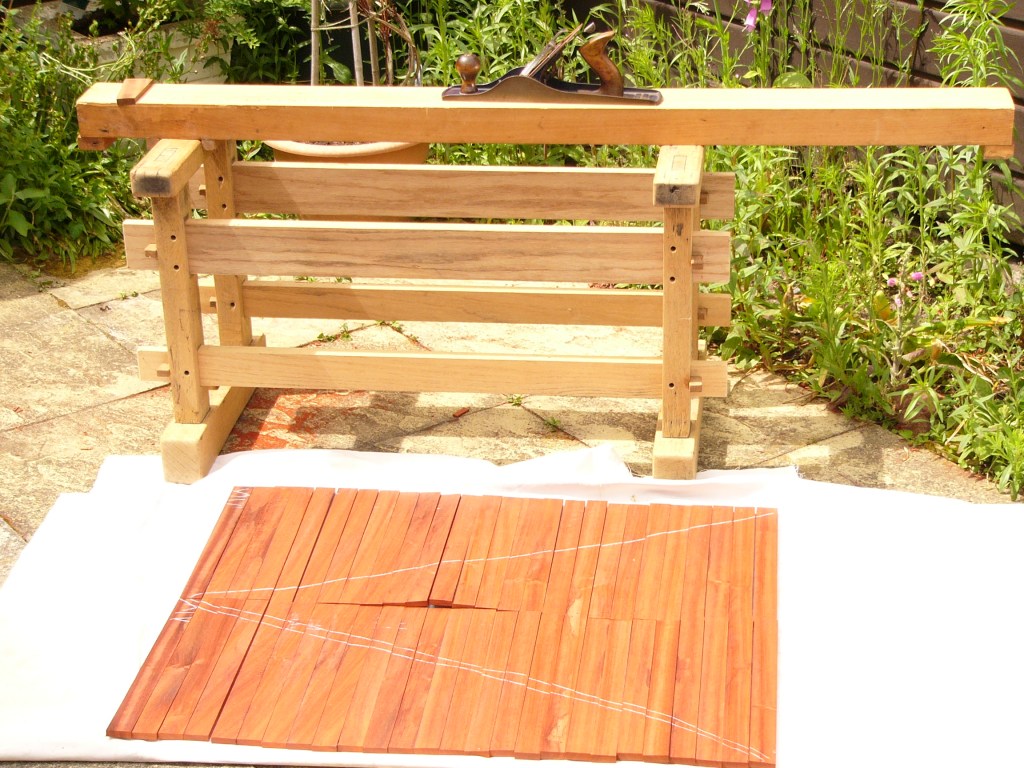
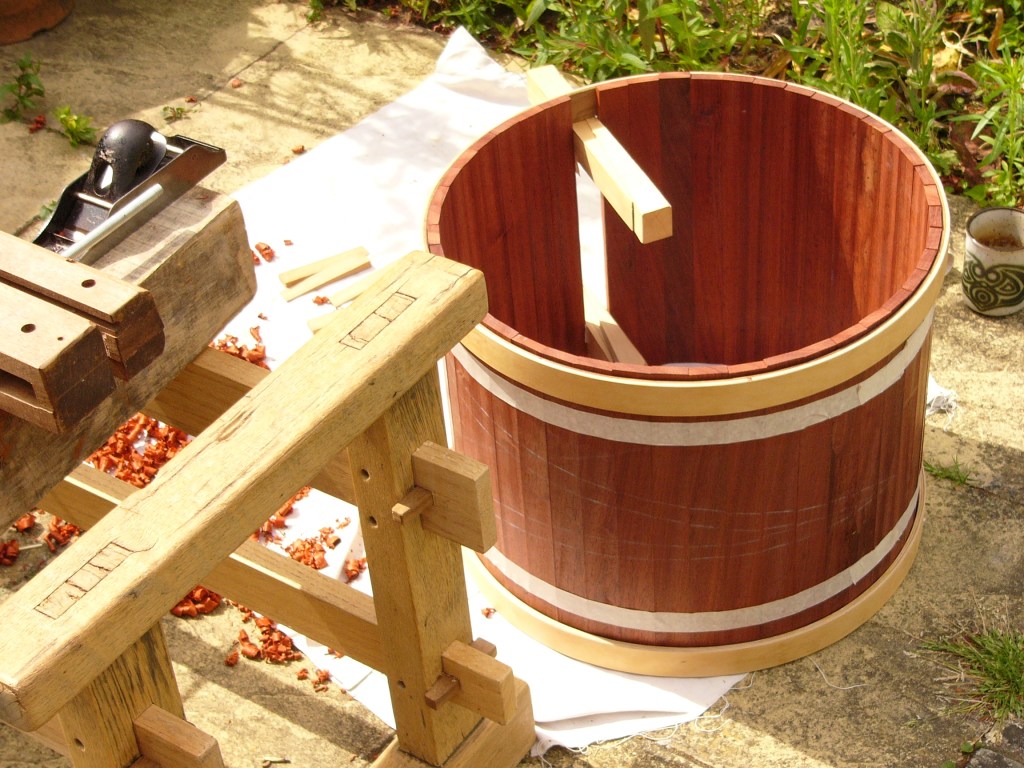
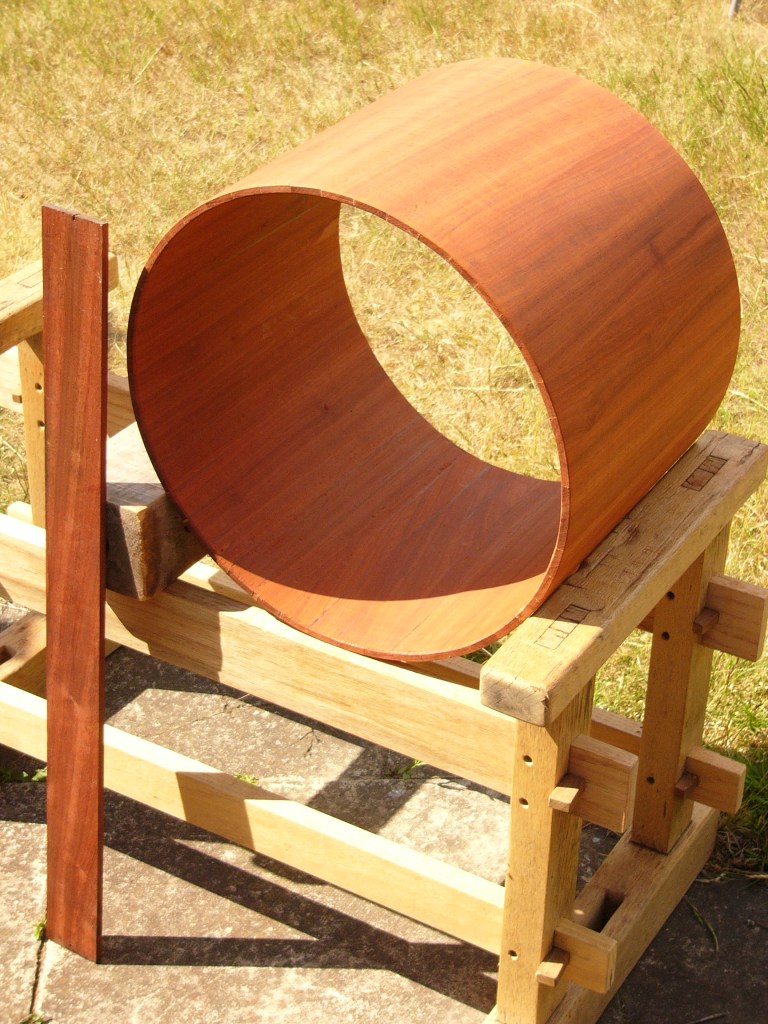
This is the sawhorse/bench where I do most of my ‘woodwork’. Hopefully the photos give you an idea as to how it works.

This photo shows all the boards ripped in half. One of them split while sawing, so I worked some glue into the split and clamped it.

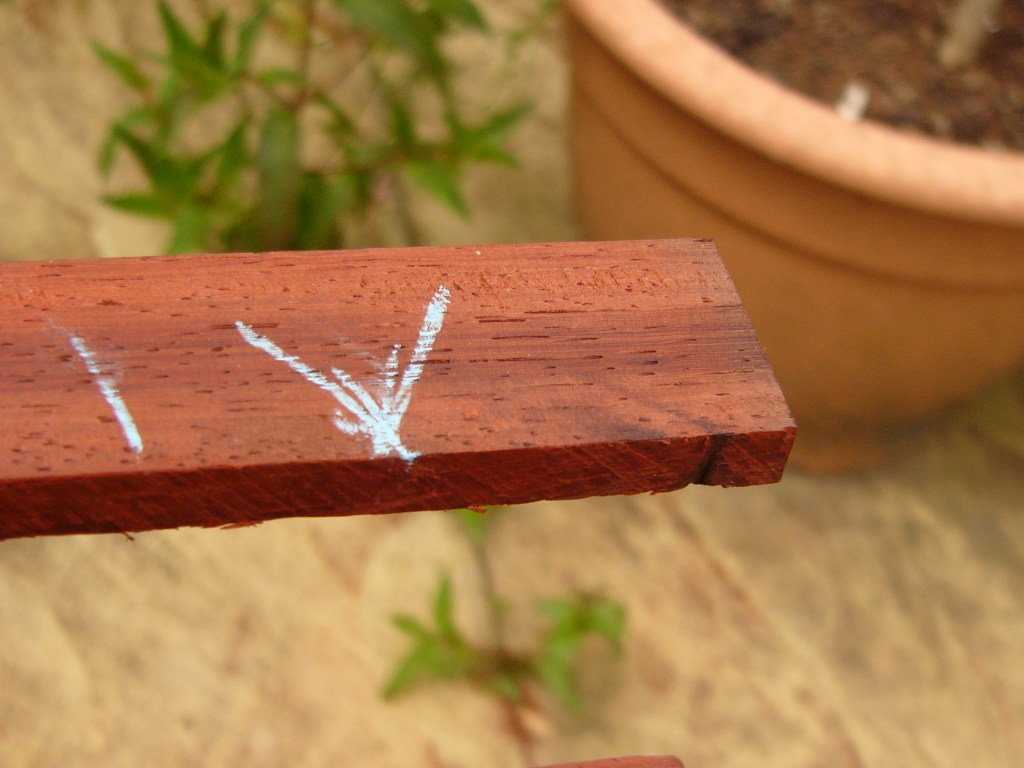
As I say, I’ve been storing these boards for nigh on thirty years. Over that time I have planed the faces at least twice, but the boards still bear the scars of their previous life.
Each board has a small nail hole in the middle at each end. The holes are only small – less than 1mm – but that little nail was sufficient to split the boards in some cases.
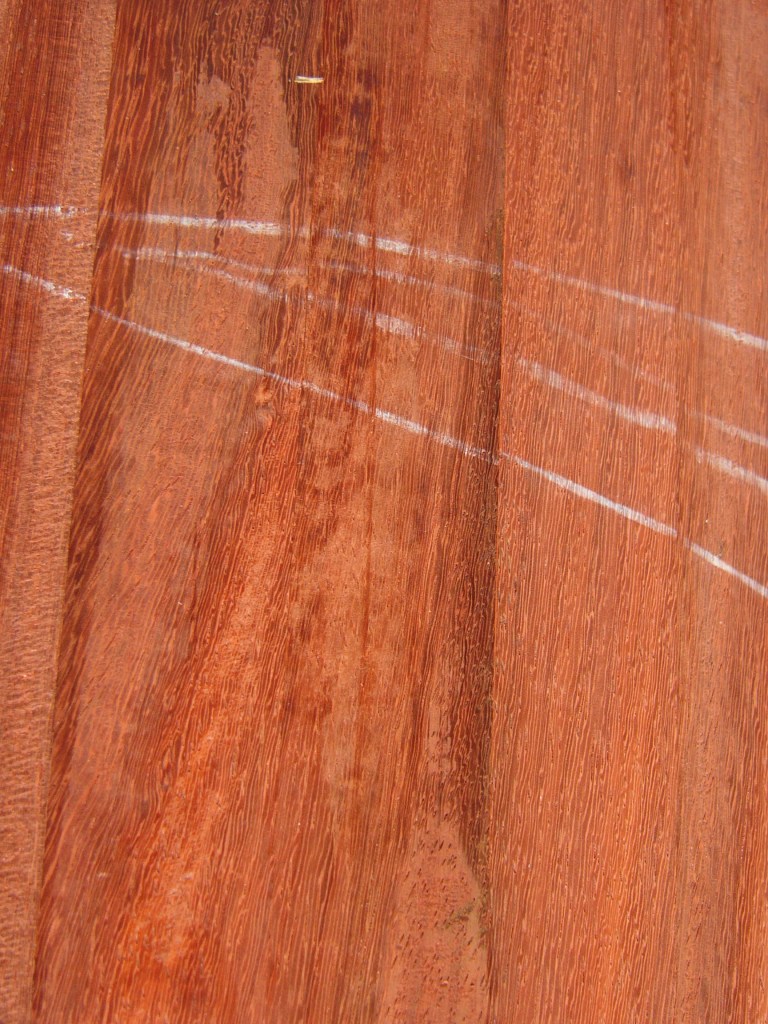
The boards also have chunks of grain torn out, probably from being fed through a machine-planer. Padouk often has interlocking grain, which makes it difficult to plane effectively.
The photo shows what happens when such wood is machine-planed (dark spots at top of middle board) and hand-planed (bottom of middle board).

As I said, you are looking at wood which has been hand planed three times since that machine-planing, so the machine planing craters were initially much bigger than they are now.
Those marks on the second from left board are saw marks which were obviously too deep to get machine-planed away. In the foreground is one of the nail holes and the split created by it. The wedge is just to open and show the split.
This photo shows a fresh saw cut exposing a nail hole.
Saturday 9th of June 2018 10am-12. Cross-cutting to get two 14″ boards out of each length.
Much easier with a mitre box.

This photo shows all the boards cross-cut to just over 14″.

I am left with quite a few offcuts of between 2 1/2″ and 6 1/2″. Probably enough for a bongo or something.

Saturday 9th of June 2018 2pm-5pm. Planing faces.
I planed the faces of all the boards again, hoping to remove any twisting or warping from them. Padouk is famously stable, but a few of the boards have moved a bit over the years, and also some latent tension in the wood was released by rip-sawing.
Another component of my bench – the flat beam I do most of my planing on.
The chalk marks on the staves are an attempt to keep them in order.
Some of the best kindling that money can’t buy.

Sunday 10th of June 2018 9am-12. Planing faces.
Sunday 10th of June 2018 2pm-5pm. Planing edges.
If my maths is right, it should take fifty-two 1 1/4″ wide staves to build an 18″ drum, and each stave will need its edges planed at an angle of 3.333333 degrees.
You’d need a very accurate jig to take the guesswork out of producing those angles, and I don’t have one, so my first job is to get as close as I can using instinct and a hand-plane.

Monday 11th of June 2018
I was going to continue planing those angles on the staves I didn’t get through yeserday, but I seem to have stripped the thread on that little vice, so it cannot be tightened any more.
I had to do the rest of the staves in an engineer’s vice… and I’ll have to think about making myself a new woodwork vice.
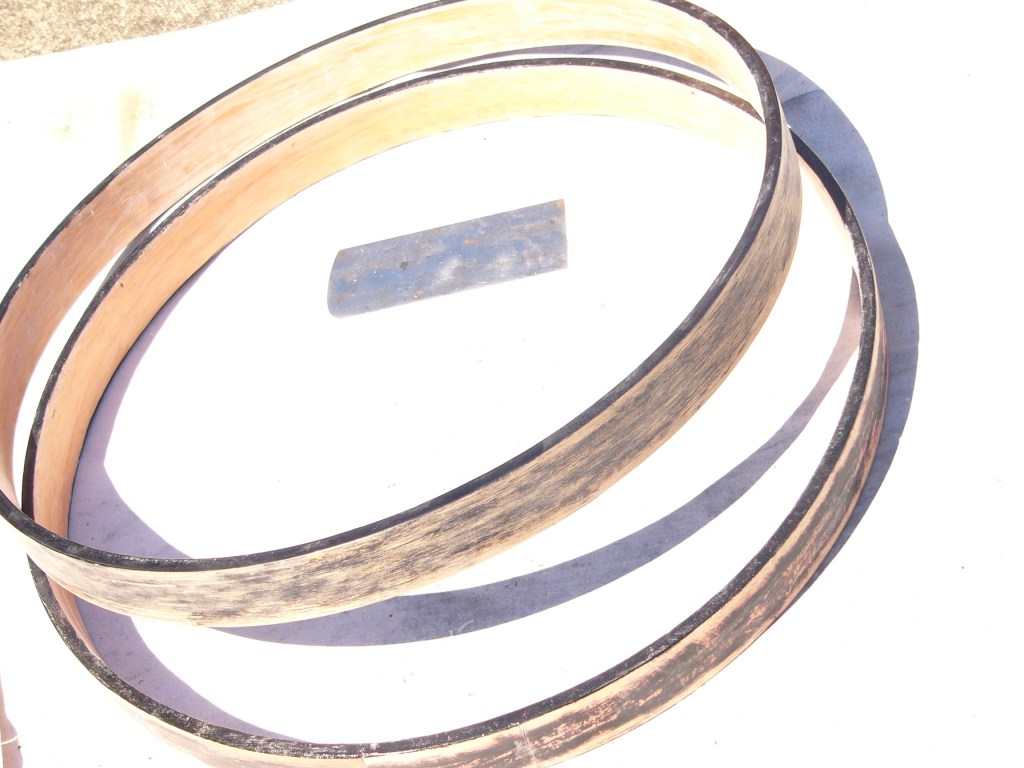
I was going to build this drum inside the original pair of 18″ hoops that I have, but as I said, they are a bit too big in diameter, so I thought to take the black ‘finish’ off the inside faces and glue some veneer in there.
I thought it would be straightforward, but that finish was tough as hell.
Anyway, to cut a long story short, I spent much of Monday, Tuesday and Wednesday using scrapers and sandpaper to remove it. It is now a foul smelling plastic dust…. more guilt.
Then I had to deal with all the delaminations in the hoops.
It is weird to be one day hand-planing the nicest timber you’ve got, and the next day making repairs to the cheapest plywood you can imagine.


People who do woodwork have two pieces of wisdom.
One is: “Measure twice, cut once”, and the other: is “You can never have enough clamps.” Clamps of every size, weight, and form.
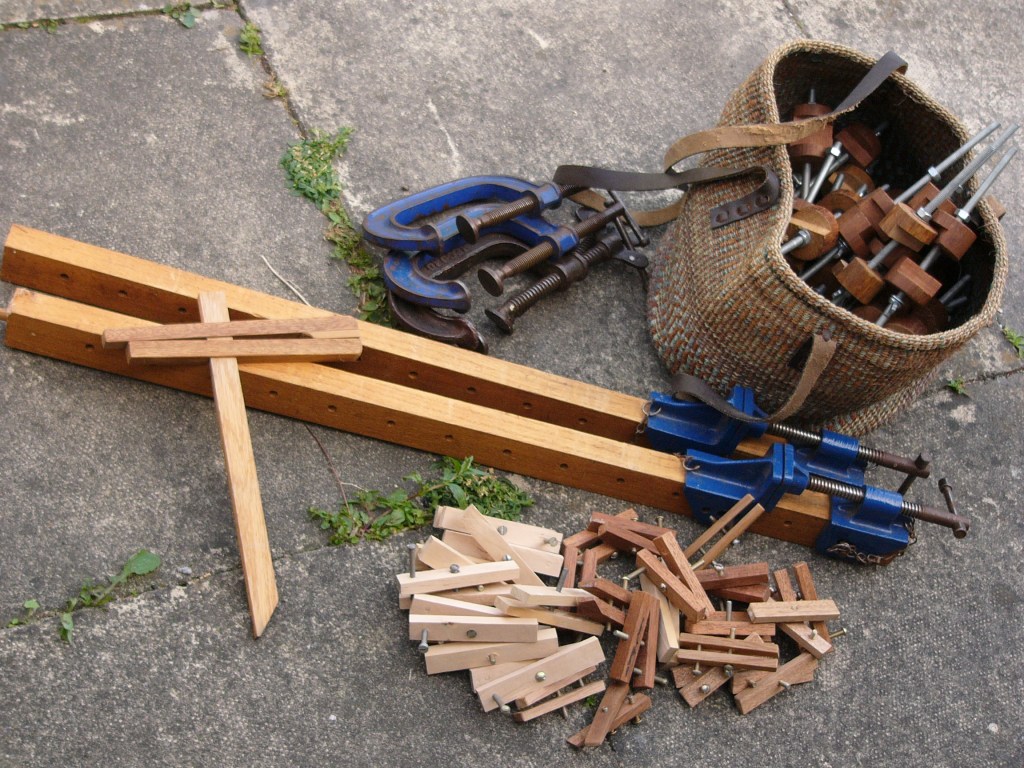
Wedges, too.

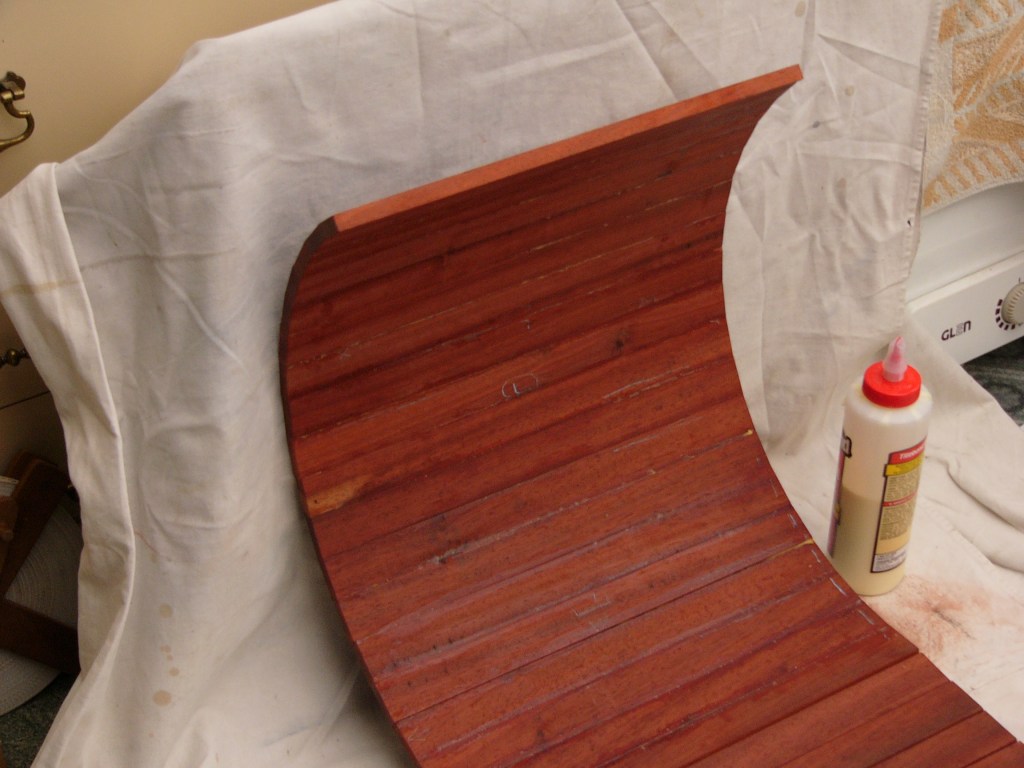
Anyway, before that I was able to fit the staves together without glue inside the new hoops I have just made.
I lay the staves out in a row, outer face upwards, run some masking tape along them, then lift them up as a unit
on their ends and pull them into a circle. Then I get the hoops over them, and some wedges in the gap to hold the staves tight against the hoops.
As it turns out, I only needed forty-four staves to get that far, so I have some left over for another bongo, or something.


That is what I’d call a ‘first fitting’.
These photos show a few egregrious problems which will be dealt with at the ‘second fitting’.


And some of the staves fit pretty good already:
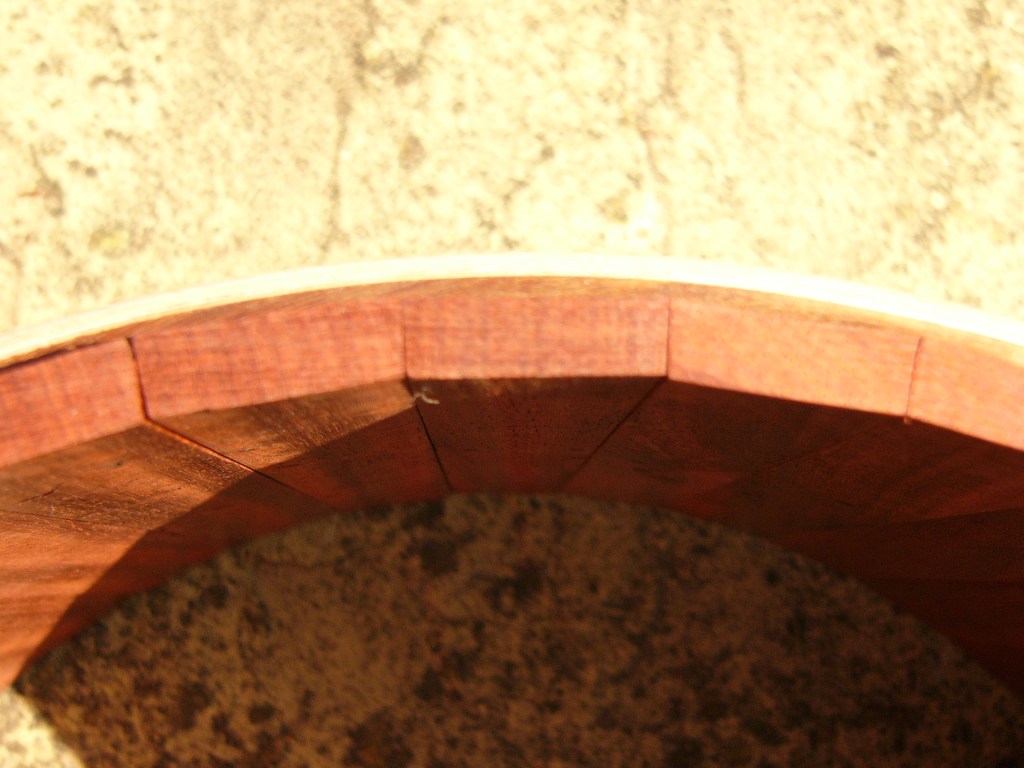
You could just slop loads of glue on and glue that lot together as it is. That gap with the light showing through is less than 1mm wide. But we try not to do stuff like that.
Thursday 14th of June 2018 2pm-5pm. Building myself a new vice.
I had these two chunks of dense timber two feet long that were once a door sill or window sill.
Really all I had to do was to square them up and bore two holes in each of them and put some 10mm studding in the holes.
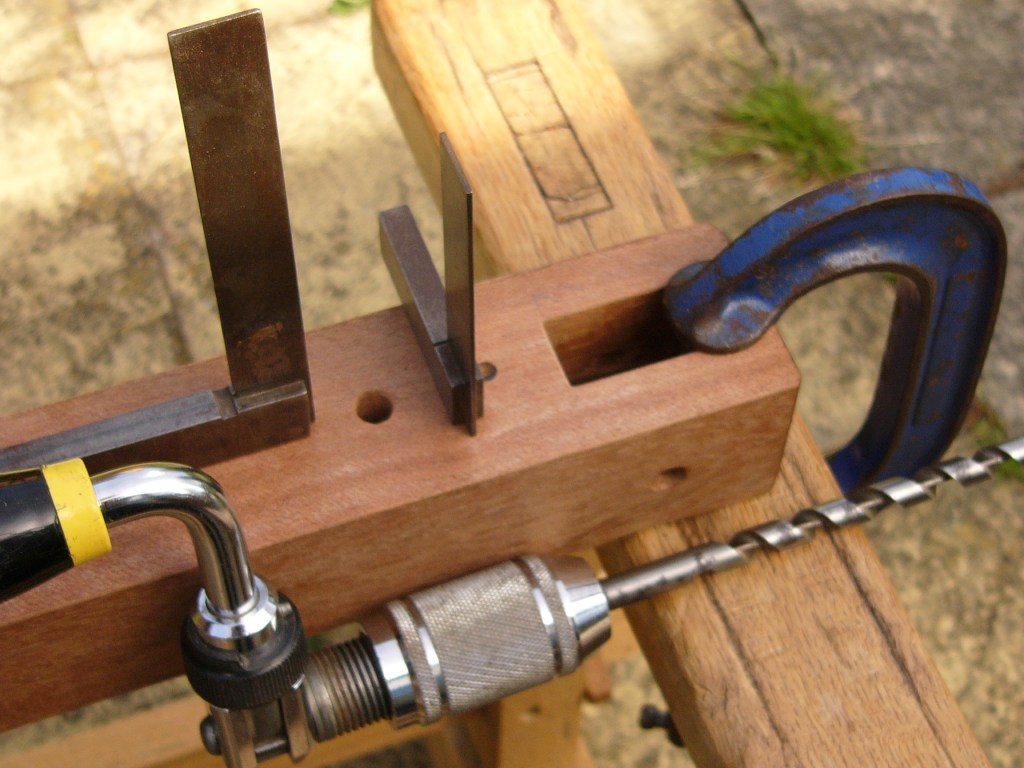
I used to think I was too skilful to bore crooked holes.
Bitter experience has taught me that I am incompetent enough to need the guidance of two squares to have a hope of boring a straight hole.
Friday 15th of June 2018 12-5pm. ‘second fitting’.
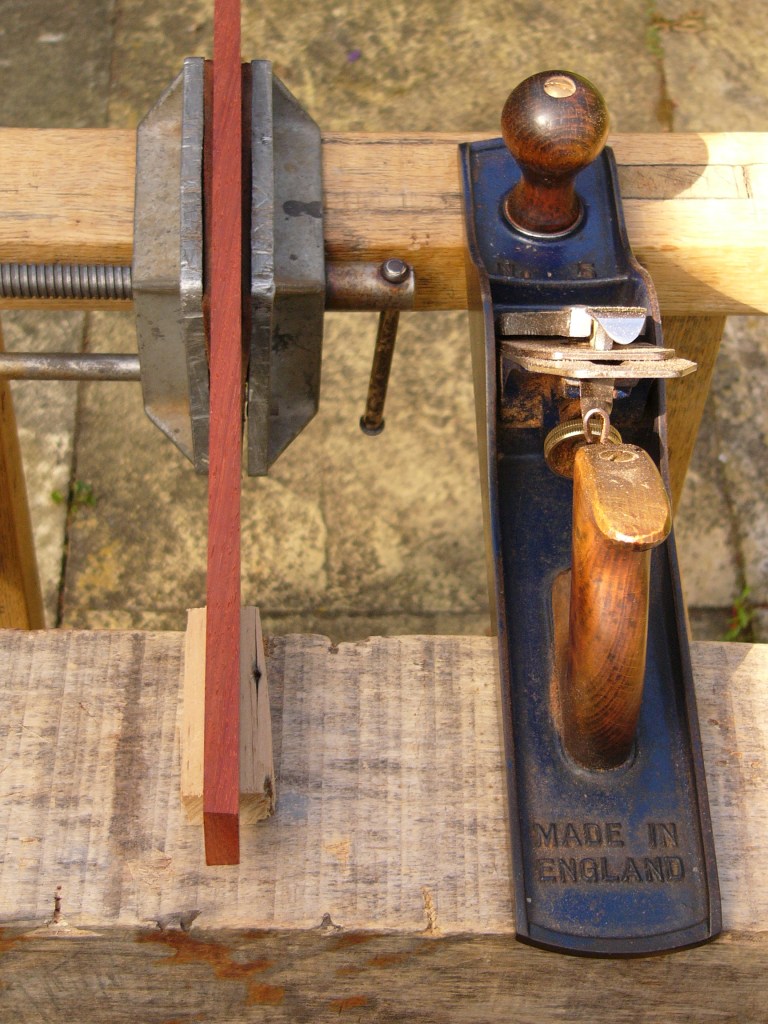
And here is my new vice with stave number one held very securely between its jaws.

I’ve got to work all the way around the drum, working out what each stave needs in order to fit closer to its neighbour, dislodging one stave from the masking tape, clamping it in the vice, planing it’s two edges, returning it to its place, and checking the fit.

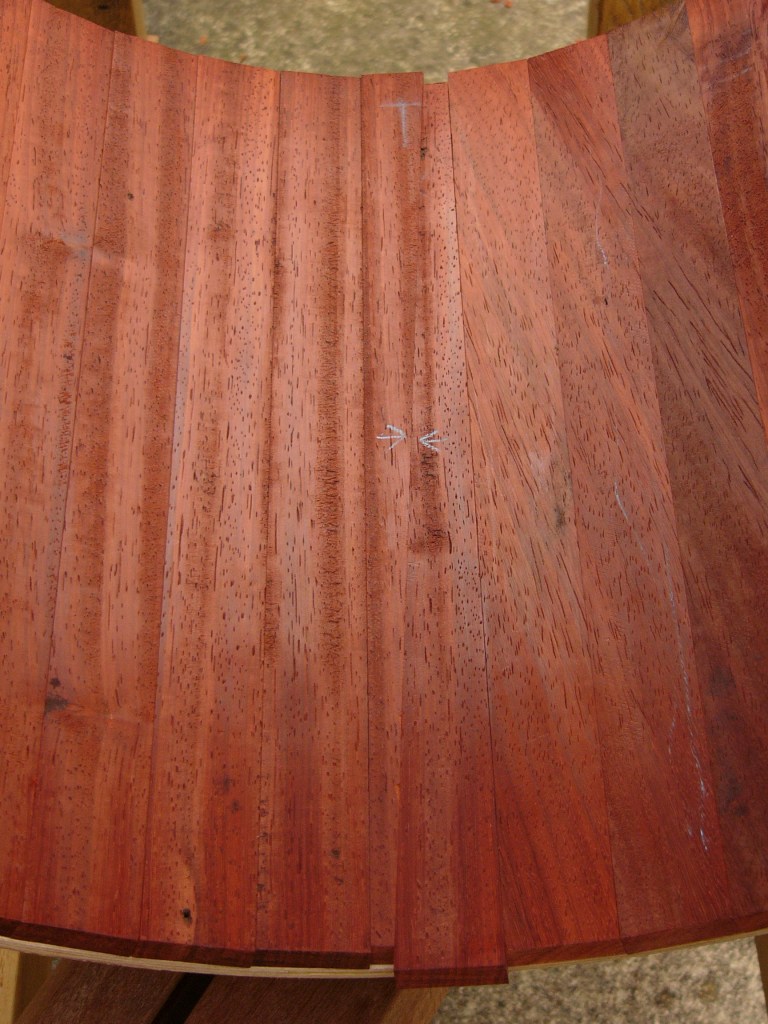
I got more than half way around before I needed a break. And I marked two staves with a chalk ‘T’ because they were twisted. I will probably swap them out.
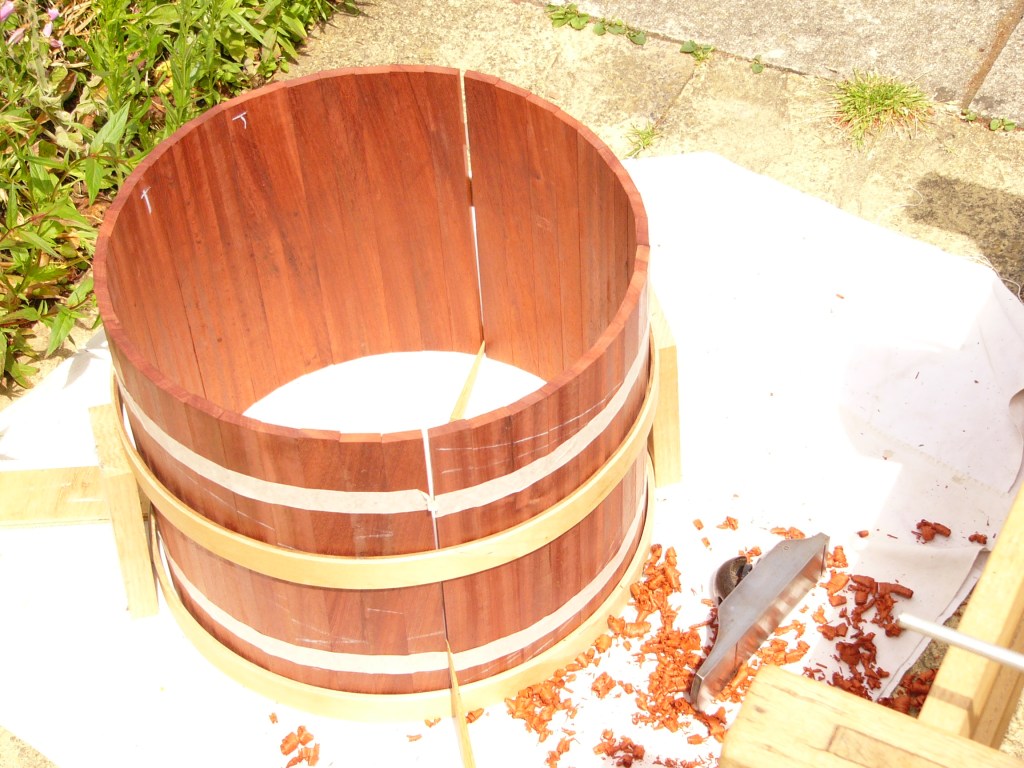
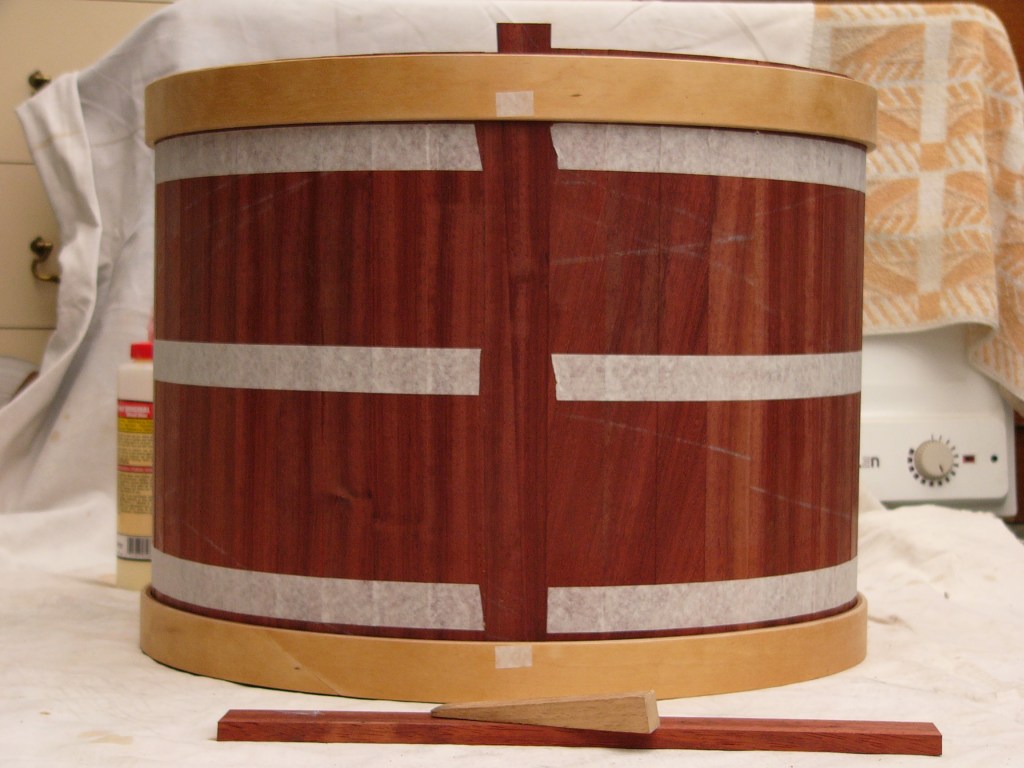
Here’s how it looked after I got all the way around. Notice that the ‘gap’ is much wider now than it was before, so I’ve had to move to some bigger wedges.
Close-up of a few staves.
Close-up of the twisted staves, plus one stave marked ‘X’ that looks a bit cracked near the end and will also be swapped out.

Saturday 16th of June 2018. 10am-12; 3pm-7pm.
Today I did a bit more fitting of the staves and I am happy enough to consider gluing them together now.
One last job before that can happen was to make the last stave, which is in fact a pair of wedges.
Sunday 17th of June 2018. Gluing the staves.
The first gluing job is to glue one of the two pieces of wedge-stave to its neighbouring stave – NOT to the other half of the wedge-stave.
I’m not going to try and glue forty-five staves in one go. I will be working round about five staves at a time.
So, the procedure is:
1) Remove wedge and hoops.
2) Lay the as yet unglued staves flat, inner face upwards, while supporting any already glued staves against a vertical surface.
3) Work glue into the joints of the next five staves.
4) ‘Roll up’ all the staves back into a cylinder.
5) Replace the hoops.
6) Make sure the outer faces of the freshly glued staves are flush against the hoops.
7) Replace the wedge.
8) Make sure the masking tape is still secure on all staves.
9) Clean up excess glue.
10) Go and do something else while the glue dries.
There is a bit of a knack to some of that, mainly in making the transition from ‘flat’ to ‘cylinder’.
You have to be careful not to let the as yet unglued staves collapse inwards when you are removing or replacing the hoops.
On the other hand, you don’t want to break the masking tape by trying too hard not to let the staves collapse inward, if that makes sense?
As long as the hoops are on and the wedge is in, glue or no glue, masking tape or no masking tape, if you’ve done your joinery properly the drum is ‘secure’ and can be picked up with one hand, rolled along the ground, or whatever.
Without the hoops, glue or no glue, it is fragile and needs handling with care.
This is the start – no glue yet except the wedge-stave glued to its neighbour.
Layed out flat ready to glue the first five staves.
Glue dry on first five staves. Ready to apply glue to second five staves.

Glue drying on second five staves.

Ready to glue third five staves.
Well… I think it was after spreading glue on the fourth lot of five staves that the masking tape did break.
Probably due to leverage from the already glued staves.
I tried to patch it up and carry on, without much success, until I realised that with about half the circumference already glued, there was now enough ‘3D structure’ to abandon laying the unglued staves out flat, and instead just work with the drum on its end, like in the photo below.
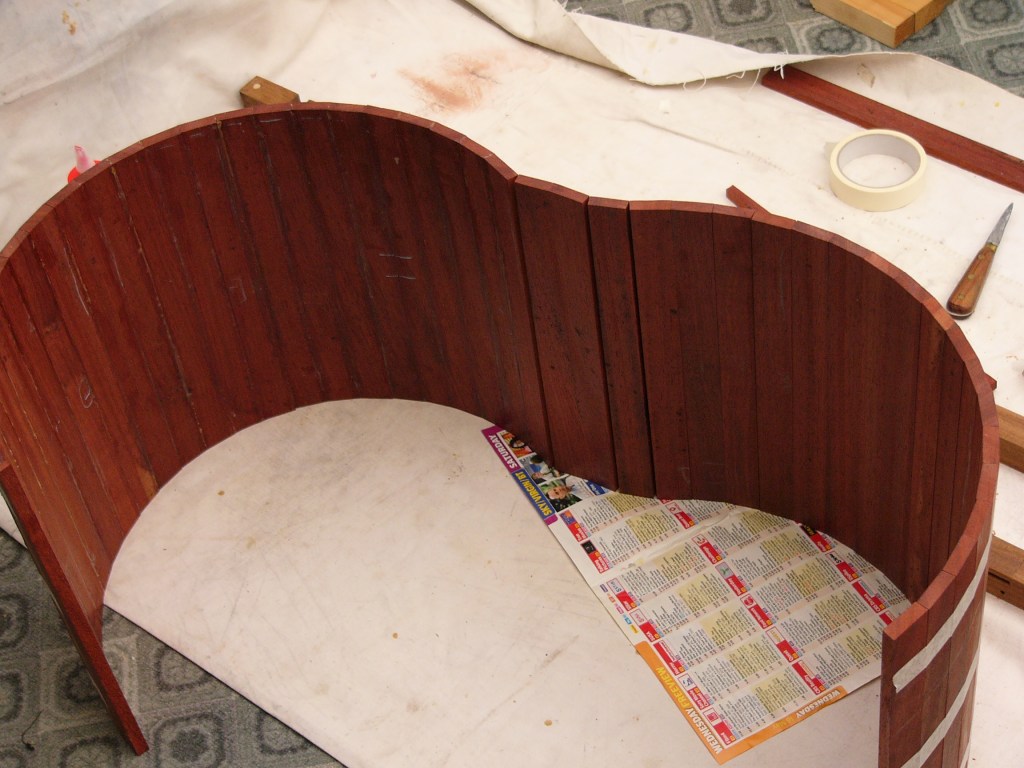
The glued staves are on the left, the yet to be glued on the right, and the five that are about to get glued in the middle.
You can probably just about see two horizontal chalk marks in the centre of two of the staves just to the left of the middle. That is where the masking tape broke.
Monday 18th of June 2018. 8am-12.
As you glue more staves, the wedge-stave tends to get slightly more difficult to drive home all the way.
The glue-in joints doesn’t take up much space, but twenty-plus glued joints have some thickness, even if it is measured in microns.
So the wedge needs some wood planing off one edge, and will doubtless need it again before it is itself glued in. Always being careful not to plane too much off.
Before:

After:
As the drum takes shape you can move a bit faster – I glued six staves this time:

And just after this photo, I glued another seven, leaving just three more to do:
Monday 18th of June 2018. 2pm-8pm
Once I had glued the last three staves in, I planed the edge of the wedge-stave.
I think it took five or six journeys from the plane to the drum and back again before I was satisfied with the fit.
Even then I had to hit it pretty hard with a mallet to get it in place once the glue was on it.

And once that glue was dry I started on planing the inside of the drum.
It is bad enough trying to plane interlocked grain wood like Padouk when you are planing flat. On an interior curve there wasn’t much chance of getting a ‘finish’ with the plane.
I was just trying to get down to the point where the glue-lines disappear. the rest will have to be done with sandpaper.

Tuesday 19th of June 2018 11am-5pm. Sanding.
At least six hours of sanding.
I hate sanding.
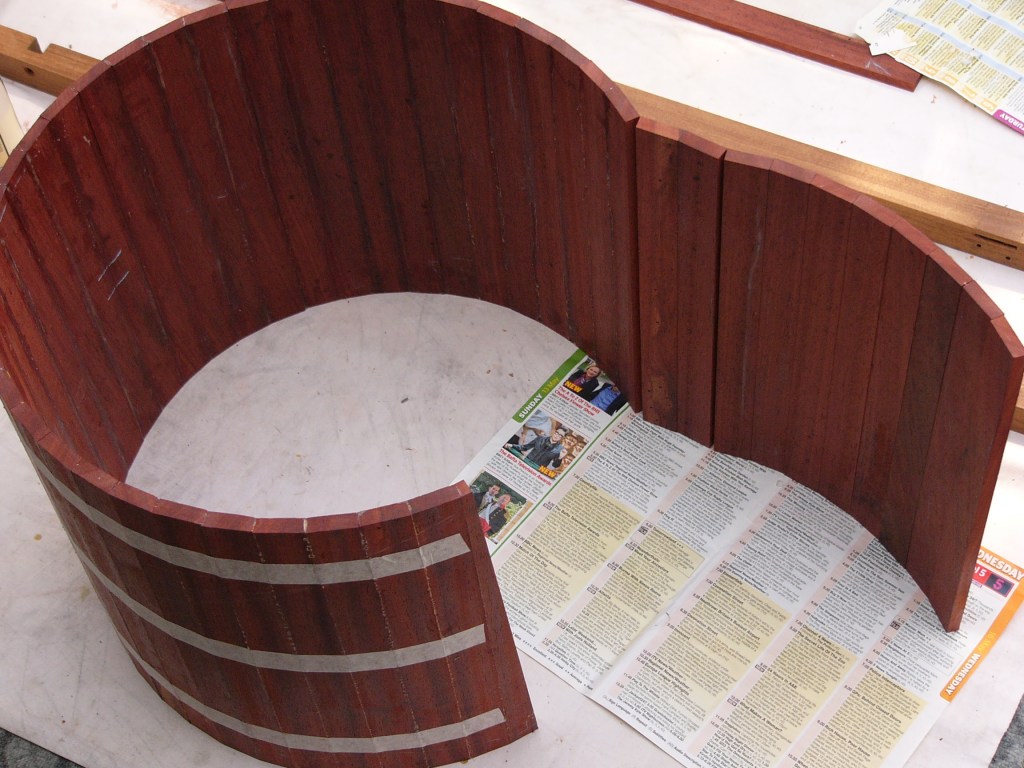
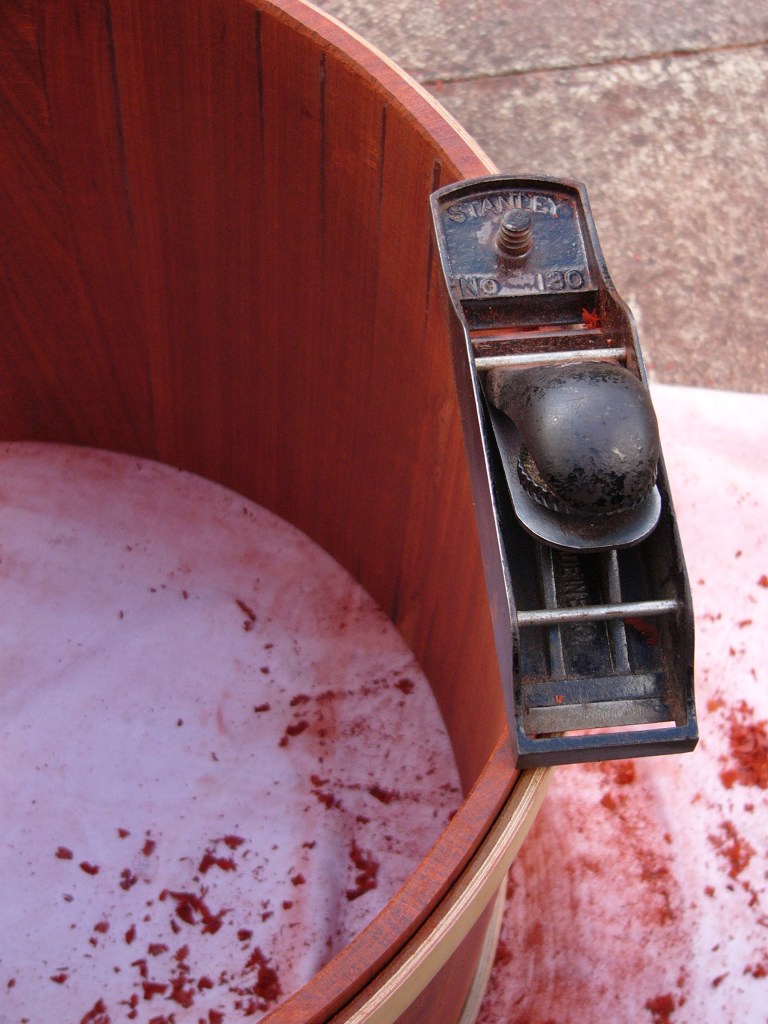
In the first photo, I have sanded the inside of the drum, and also taken off the angles of the joints on the outside of the drum with a block plane.

In the second photo I have done some sanding on the outside of the drum. The dark ‘stripes’ are the places the sandpaper has yet to reach.

Wednesday 20th of June 2018 9am-12. 1pm-4pm. More sanding.
This photo shows the result of three hours more sanding:

Just passin’ thru…

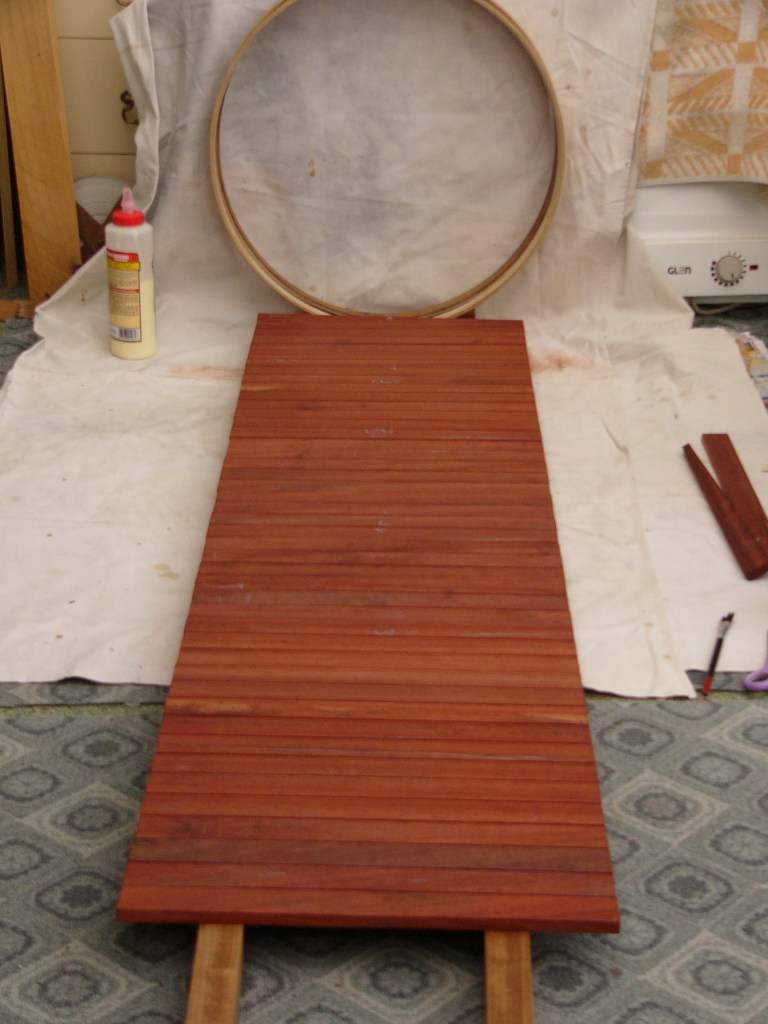
And after another three hours – the drum next to my last remaining uncut board of Padouk
A few staves in close-up

Thursday 21st of June 2018
Today I did a bit more sanding, inside the drum and outside, and now I’m pretty much all sanded out.
Then I refined the bearing edges a bit with the block plane.
Friday 22nd of June 2018
Here’s how I get the bearing edges flat.
If you put the drum on a flat surface, it will ‘rock’ around the high points, and you can slide a scrap of paper up to the rocking point, mark it with chalk, and then plane the high point away.

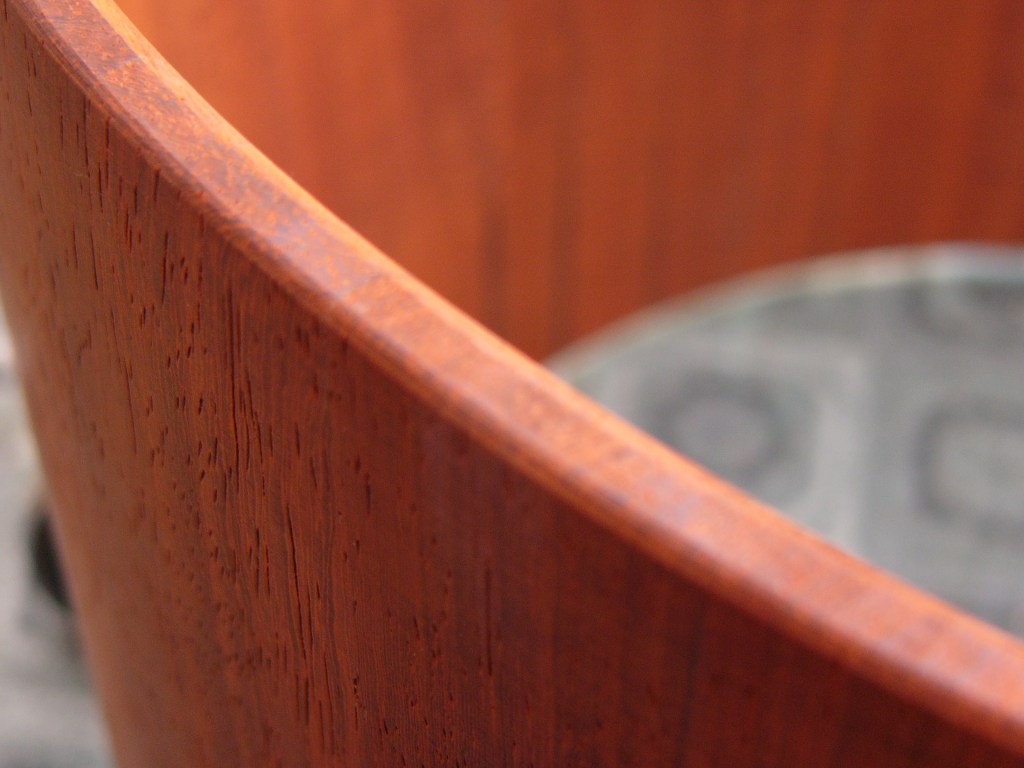
Close-up of bearing edge.
The next job was to mark the centres of the holes which need to be drilled to accept the lugs.
A tape measure around the circumference of the drum, divide by eight…
…I reckoned on a distance between the lugs of seven inches plus one and a half sixteenths, or 7 3/32″.
One lot of centres are 2 3/8″ from the bearing edge, and the other lot are 37mm from the first lot, if that makes sense?
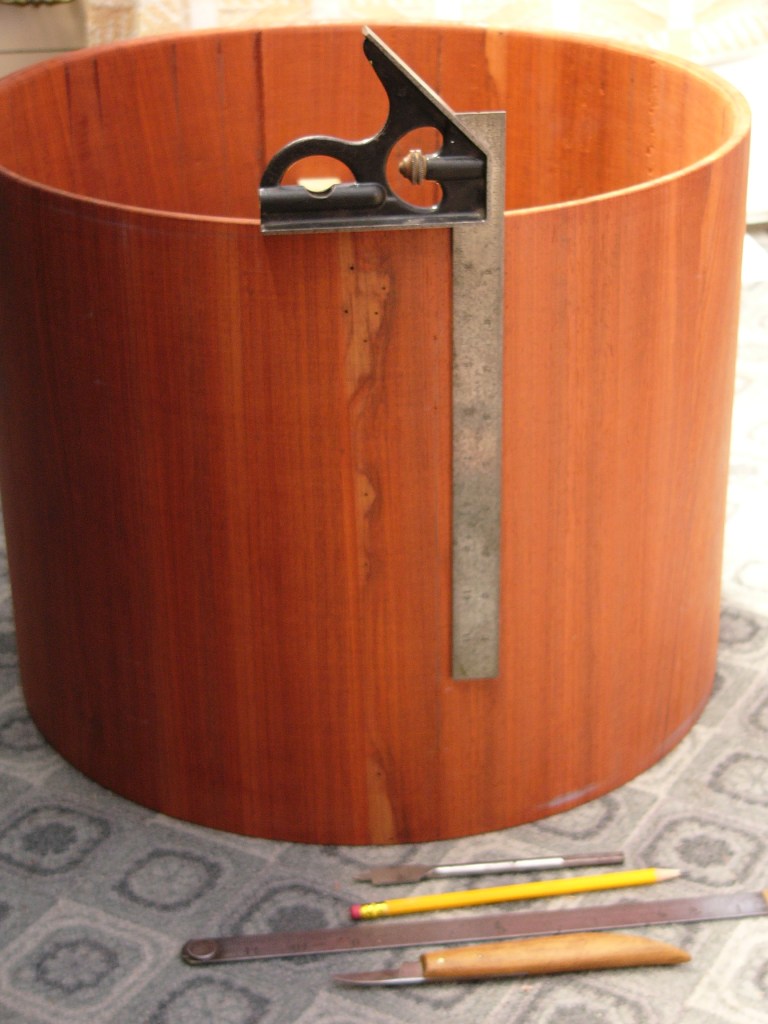
The drum with marking out tools.
I rigged up some wood across the diameter of the drum to transfer the drill pressure to a solid object.
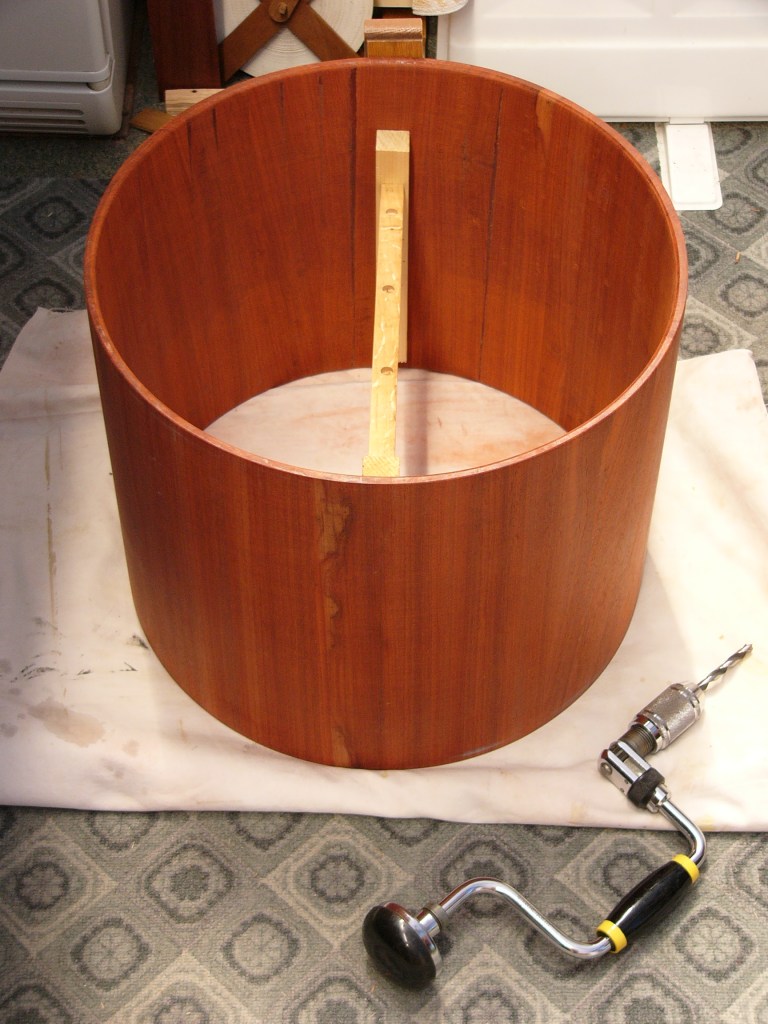
All the holes drilled. Just one pair of holes were fractionally too far apart, so I doctored one of them with a round file.

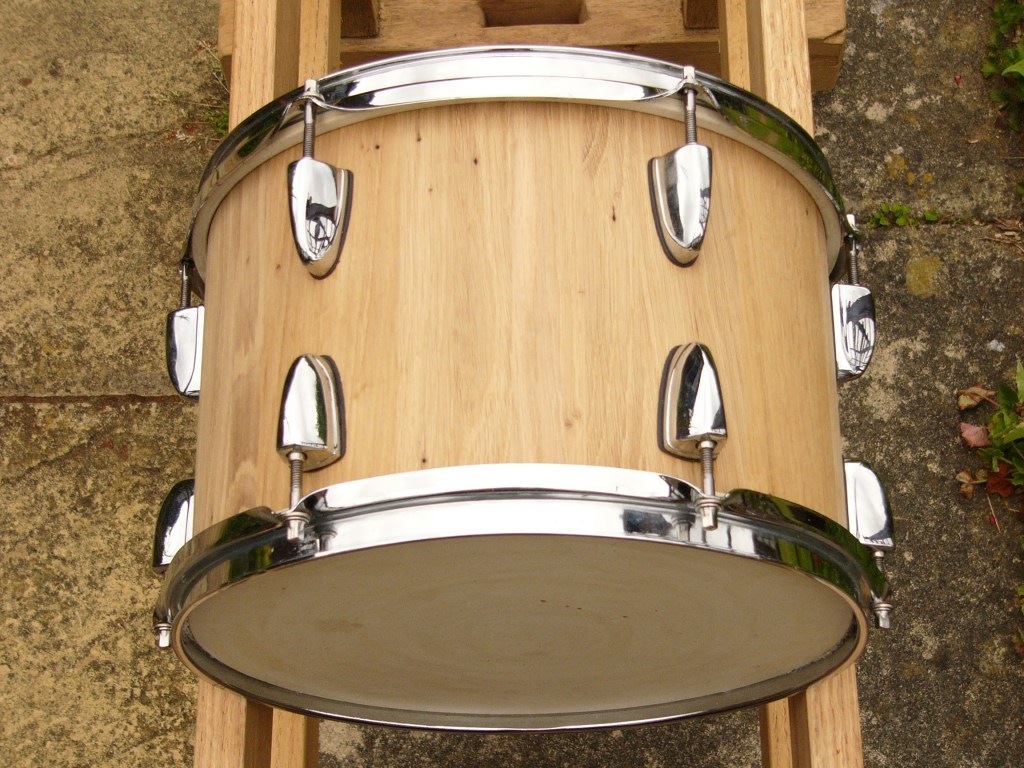
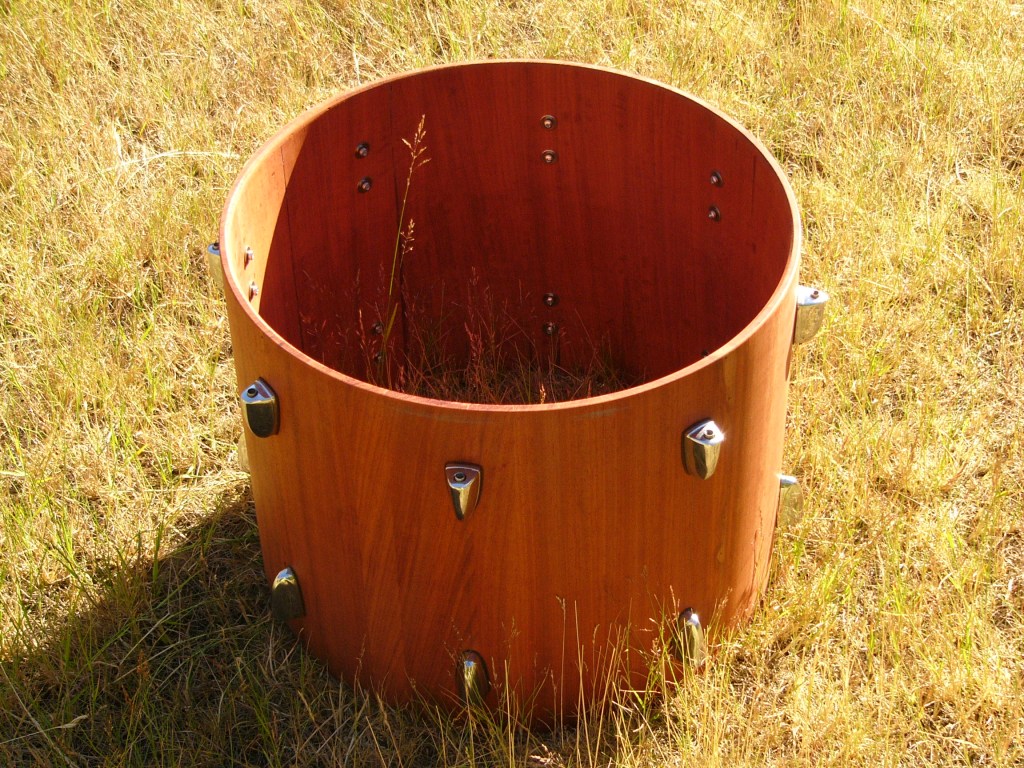
All the lugs attached to the drum. Because the original shells were thin plywood, the little machine screws which screw into the lugs from inside the drum were 5mm too short.
Luckily for me my local hardware store had some longer ones.
And then of course I put the skins and hoops on.
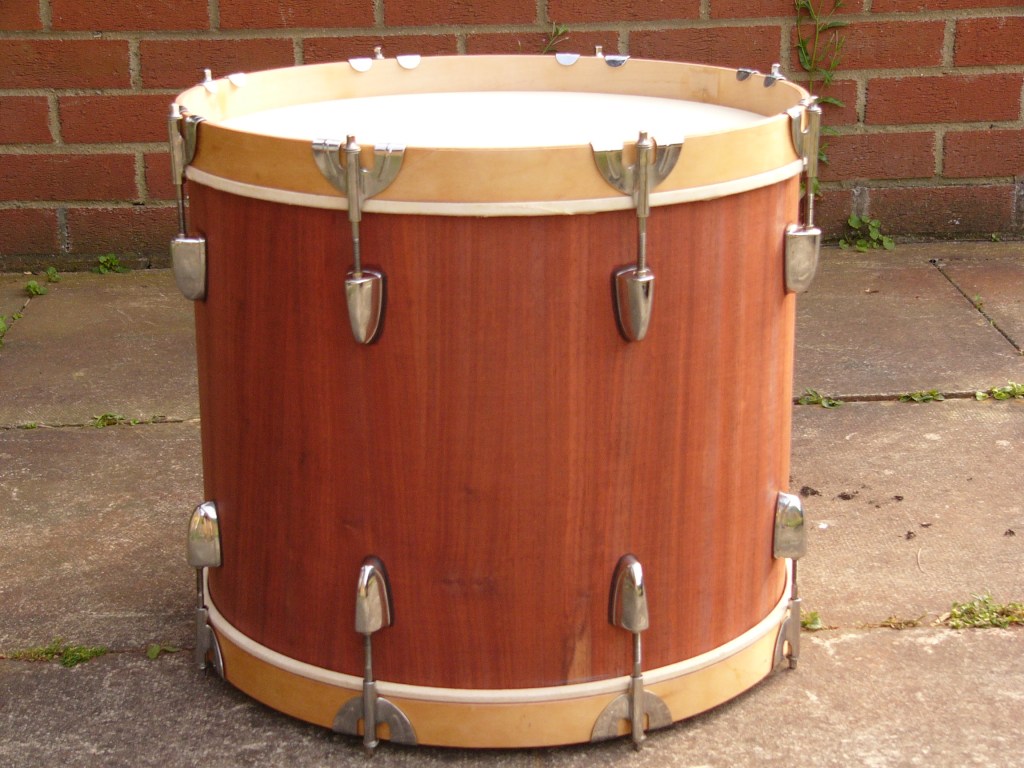
I’ve got some more chunks of chromed metal hardware to go on yet – the tom mount and the spurs, but I’m leaving the drum like this for the moment.
So there you go… two weeks’ work.
…And then I took pity on this snare shell I made a few years ago. It is slightly undersized diameter-wise, so I cut it up into eight segments.

P.S. I’ve just realised that I can anagram my name as ‘Paduk crime’.. so now I wonder whether the crime was in picking the stuff up in the first place, or using it for the wrong thing, or at the wrong time, or both, or devoting so much energy to it when my dad was a few months from death.
.
MD


Leave a comment